Build an Online Course with Vue

Anthony Gore
Published 2022-04-13
A great way to share your knowledge is with an online course. Rather than being stuck with the boring and inflexible lesson pages offered by the well-known course platforms, we can build our own so we can make the design and UX exactly how we like.
In this tutorial, I’ll show you how to create a single-page app course site using Vue 3 & Vite. The features will include markdown-based content, embedded Vimeo videos, and lesson navigation.
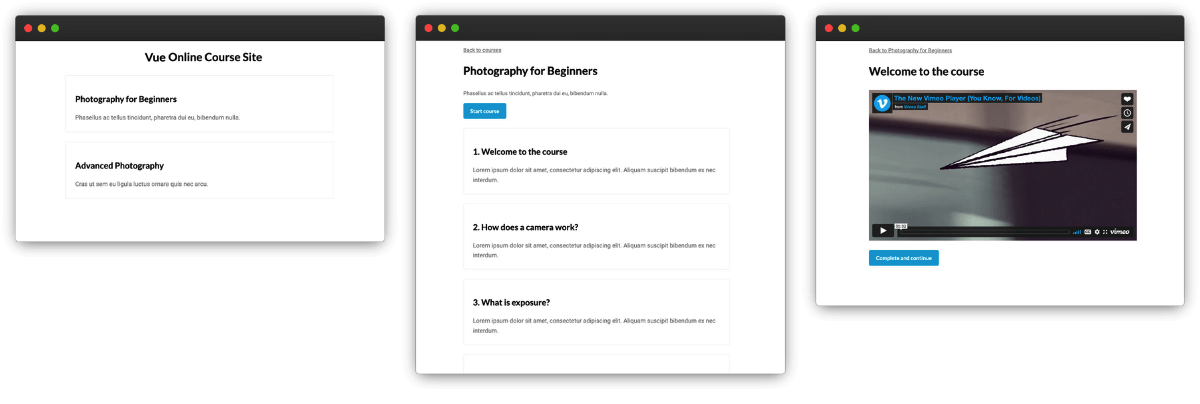
We’ll make this a static site so you won’t need a backend. Here’s what the home page, course page, and lesson page will look like:
At the end of the tutorial, I’ll also show you how to (optionally) enroll students so you can track student progress and protect lesson content so you can monetize your course. For this part, we’ll integrate CourseKit which is a headless API for hosting online courses.
You can view a demo of the finished product here and get the source code here.
Set up with Vite
Let’s go ahead and set up our single-page app course site using Vite.
$ npm create vite@latest
Follow the prompts and name your project vue-course and select the Vue framework.
Then go ahead and change into the directory and install dependencies.
cd vue-course
npm install
We’ll also need Vue Router for setting up the course pages.
$ npm install --save vue-router
With that done, let’s fire up the dev server and start building!
$ npm run dev
Add router to project
Let's now create a file to configure the router:
$ touch src/router.js
We’ll now need to edit src/main.js and add the router to our app.
src/index.js
import { createApp } from 'vue'
import App from './App.vue'
import router from './router'

const app = createApp(App)
app.use(router)
app.mount('#app')
Configure router and create pages
Our courses app will have three pages:
- A home page that will show the available courses.
- A course page that will show the info of a specific course and its lessons. This will have a dynamic route
/courses/:courseId. - A lesson page that will show a specific lesson. This will have a dynamic route
/courses/:courseId/lessons/:lessonId.
Since we’re using Vue Router, we’ll create a component for each of these pages. Let’s put these in the directory, src/pages.
$ mkdir src/pages
$ touch src/pages/Home.vue
$ touch src/pages/Course.vue
$ touch src/pages/Lesson.vue
Let's now configure the router. We'll import the router APIs and the page components. We'll then setup the routes with the paths mentioned above. Finally, we'll create and export the router from the file.
src/router.js
import { createRouter, createWebHistory } from 'vue-router'
import Home from './pages/Home.vue'
import Course from './pages/Course.vue'
import Lesson from './pages/Lesson.vue'

const routes = [
  { name: 'home', path: '/', component: Home },
  { name: 'course', path: '/courses/:courseId', component: Course },
  { name: 'lesson', path: '/courses/:courseId/lessons/:lessonId', component: Lesson }
]

const router = createRouter({
  history: createWebHistory(),
  routes,
})

export default router
Add pages to App component
We’ll now go to the App component and clear out the contents. We'll then create our own template where we declare the RouterView component that serves as an outlet for our routes.
src/App.vue
<template>
  <div class="App">
    <main>
      <router-view></router-view>
    </main>
  </div>
</template>
With that done, we’ve set up the page structure of our course app.
Create course data file
Since we aren’t using a backend API, the data for our courses and lessons will be stored in a nested JavaScript array. This array will be used to populate the content of our app.
The array will consist of course objects with an id, title, description, and a sub-array of lesson objects.
The lesson objects will have an id, title, and description, and will also include a vimeoId which will be the ID for the lesson’s video (this will be explained below).
Tip: ensure your IDs are unique and sequential.
src/courses.js
const courses = [
  {
    id: 1,
    title: "Photography for Beginners",
    description: "Phasellus ac tellus tincidunt...",
    lessons: [
      {
        id: 1,
        title: "Welcome to the course",
        description: "Lorem ipsum dolor sit amet...",
        vimeoId: 76979871
      },
      {
        id: 2,
        title: "How does a camera work?",
        description: "Lorem ipsum dolor sit amet...",
        vimeoId: 76979871
      },
      ...
    ]
  },
  {
    id: 2,
    title: "Advanced Photography",
    description: "Cras ut sem eu ligula luctus ornare quis nec arcu.",
    lessons: [
      ...
    ]
  },
  ...
]

export default courses
Create home page
Let’s now start building our pages, beginning with the home page. We’ll first import the courses array from the module we just created.
In the component template, we’ll map the array and pass the data into a new component CourseSummary.
src/pages/Home.vue
<script setup>
import courses from '../courses'
import CourseSummary from '../components/CourseSummary.vue'
</script>

<template>
  <div class="Home page">
    <header>
      <h1>Vue Online Course Site</h1>
    </header>
    <CourseSummary v-for="course in courses" :key="course.id" :course="course" />
  </div>
</template>
CourseSummary component
This component will display each course's title and description and will provide a link to the course, allowing the user to select the course they want to take. We pass in the course information via props.
src/components/CourseSummary.vue
<script setup>
defineProps({
  course: {
    type: Object,
    required: true
  }
})
</script>

<template>
  <section class="summary">
    <div>
      <div class="title">
        <h2>
          <router-link
            class="no-underline cursor-pointer"
            :to="{ name: 'course', params: { courseId: course.id } }"
          >
            {{ course.title }}
          </router-link>
        </h2>
      </div>
      <p>
        <router-link
          class="no-underline cursor-pointer"
          :to="{ name: 'course', params: { courseId: course.id } }"
        >
          {{ course.description }}
        </router-link>
      </p>
    </div>
  </section>
</template>
With that done, here’s what our home page will look like once a bit of CSS has been added (I won’t show that here for brevity but you can see it in the source code.).
Create course page
The next page we’ll create is the course page. Note that the page path /courses/:courseId has a dynamic segment for the course ID which is how we know which course’s data to show.
Let’s use the useRoute composable from Vue Router to extract the dynamic segment at runtime.
src/pages/Course.vue
import { useRoute } from 'vue-router'
const route = useRoute()
const courseId = route.params.courseId
console.log(courseId) // 1
Now we can use the ID to get the relevant course data from the courses data with an array find.
Tip: if the find returns null you should probably show a 404 page.
src/pages/Course.vue
import courses from '../courses'
import { useRoute } from 'vue-router'
const route = useRoute()
const courseId = route.params.courseId
const course = courses.find(course => course.id === parseInt(courseId))
const { title, lessons } = course
We can now define a template for the course. The header will include a breadcrumb at the top of the page and details of the course including the title and description.
We’ll then have a link to the first lesson with the text “Start course”. We’ll also display summaries of the lessons included in the course which we create by mapping over the lessons sub-property and passing data to another component LessonSummary.
src/pages/Course.vue
<script setup>
import courses from '../courses'
import { useRoute } from 'vue-router'
import LessonSummary from '../components/LessonSummary.vue'
const route = useRoute()
const courseId = route.params.courseId
const course = courses.find(course => course.id === parseInt(courseId))
const { title, lessons } = course
</script>

<template>
  <div class="Course page">
    <header>
      <p>
        <router-link :to="{ name: 'home' }">Back to courses</router-link>
      </p>
      <h1>{{ title }}</h1>
      <p>{{ description }}</p>
      <router-link
        class="button primary icon"
        :to="`/courses/${courseId}/lessons/${course.lessons[0].id}`"
      >
        Start course
      </router-link>
    </header>
    <div>
      <LessonSummary
        v-for="(lesson, index) in lessons"
        :key="index"
        :course-id="courseId"
        :lesson="lesson"
        :num="index + 1"
      />
    </div>
  </div>
</template>
LessonSummary component
Similar to the CourseSummary component, this one will receive props with the lesson’s data which can be used to show a title and description as a clickable link. This will allow users to navigate directly to a lesson.
src/components/LessonSummary.vue
<script setup>
defineProps({
  courseId: {
    type: String,
    required: true
  },
  num: {
    type: Number,
    required: true
  },
  lesson: {
    type: Object,
    required: true
  }
})
</script>

<template>
  <section class="summary">
    <div>
      <div class="title">
        <h2>
          <router-link
            class="no-underline cursor-pointer"
            :to="'/courses/' + courseId + '/lessons/' + lesson.id"
          >
            {{ num }}. {{ lesson.title }}
          </router-link>
        </h2>
      </div>
      <p>
        <router-link
          class="no-underline cursor-pointer"
          :to="'/courses/' + courseId + '/lessons/' + lesson.id"
        >
          {{ lesson.description }}
        </router-link>
      </p>
    </div>
  </section>
</template>
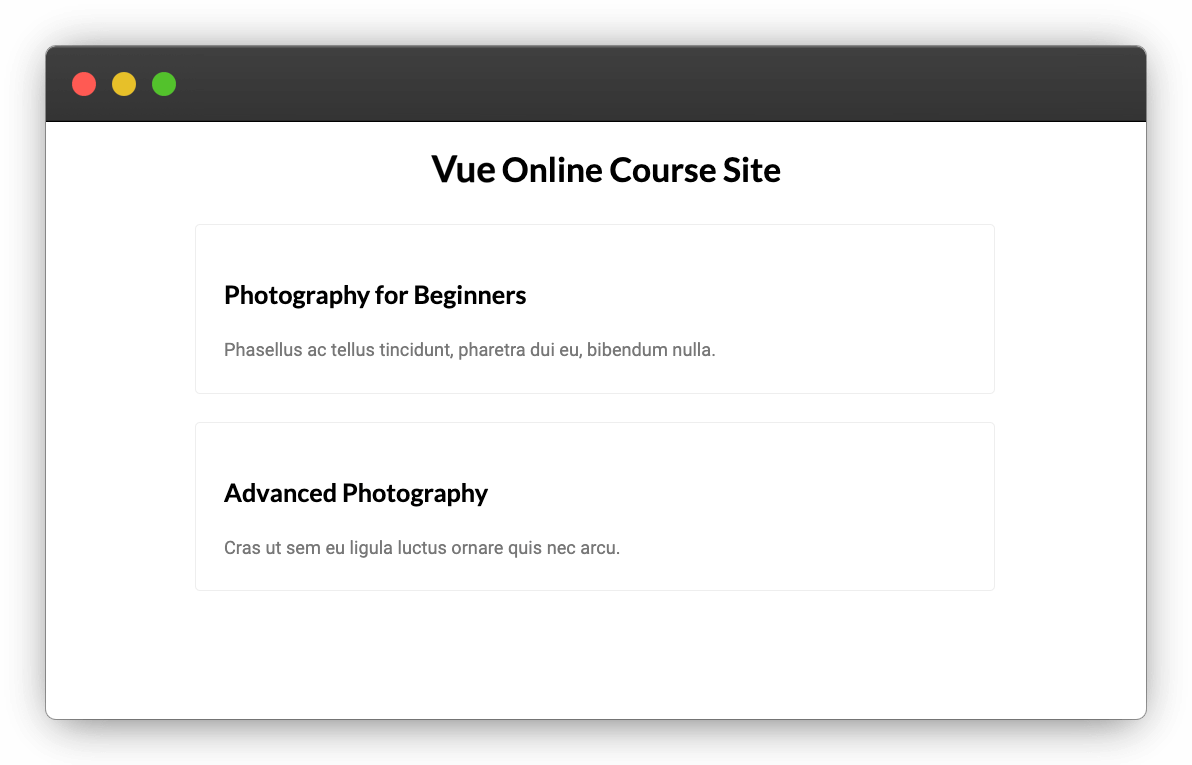
With that done, here’s what the course page will look like:
Create lesson page
Similar to the course page, the lesson page includes dynamic segments in the URL. This time, we have both a courseId and lessonId allowing us to retrieve the correct course and lesson objects using array finds.
src/pages/Lesson.vue
<script setup>
import courses from '../courses'
import { useRoute } from 'vue-router'
const route = useRoute()
const { courseId, lessonId } = route.params
const course = courses.find(course => course.id === parseInt(courseId))
const lesson = course.lessons.find(lesson => lesson.id === parseInt(lessonId))
</script>
Vimeo embed
Each lesson will have an associated video. In this demo, we’ll be using a Vimeo video, though you could use any video service that allows embedding in your own site.
All you need to do is grab the video’s ID after it has been uploaded and add it to the courses data module. The ID is normally a number like 76979871.
At runtime, we’ll embed a Vimeo video player and load the video using its ID. To do this, let’s install the Vue Vimeo Player component.
$ npm install vue-vimeo-player@next --save
Lesson page component
Now let’s create a template for our Lesson page component. Like the course page, we’ll provide a breadcrumb and the lesson title at the top of the template.
We’ll then use the Vimeo component and pass it a prop video with the vimeo ID from our data.
src/pages/Lesson.vue
<script setup>
import courses from '../courses'
import { useRoute } from 'vue-router'
import { vueVimeoPlayer } from 'vue-vimeo-player'
const route = useRoute()
const { courseId, lessonId } = route.params
const course = courses.find(course => course.id === parseInt(courseId))
const lesson = course.lessons.find(lesson => lesson.id === parseInt(lessonId))
</script>

<template>
  <div class="Lesson page">
    <header>
      <p>
        <router-link :to="'/courses/' + course.id">Back to {{ course.title }}</router-link>
      </p>
      <h1>{{ lesson.title }}</h1>
    </header>
    <div class="Content">
      <vue-vimeo-player :video-id="lesson.vimeoId" :options="{ responsive: true }" />
    </div>
  </div>
</template>
Complete and continue button
The last thing we’ll add to the lesson page is a Complete and continue button. This allows the user to navigate to the next lesson once they’ve finished watching the video.
Let’s create a new component called CompleteAndContinueButton. This will use Vue Router’s useRouter composable to navigate to the next lesson (whose ID is passed in as a prop).
src/components/CompleteAndContinueButton.vue
<script setup>
import { useRouter } from 'vue-router'
const router = useRouter()
const props = defineProps({
  lessonId: {
    type: String,
    required: true
  }
})
function completeAndContinue () {
  router.push(`/courses/${course.id}/lessons/${props.lessonId}`)
}
</script>

<template>
  <button class="button primary" @click="completeAndContinue">
    Complete and continue
  </button>
</template>
We’ll add this component directly under the Vimeo component in the lesson page template. Note that we’ll need to get the next lesson ID and pass it as a prop. We’ll create a function nextLessonId() to find this.
src/pages/Lesson.js
<script setup>
import courses from '../courses'
import { useRoute } from 'vue-router'
import { vueVimeoPlayer } from 'vue-vimeo-player'
import CompleteAndContinueButton from '../components/CompleteAndContinueButton.vue'
const route = useRoute()
const { courseId, lessonId } = route.params
const course = courses.find(course => course.id === parseInt(courseId))
const lesson = course.lessons.find(lesson => lesson.id === parseInt(lessonId))
const currentIndex = course.lessons.indexOf(lesson)
const nextIndex = (currentIndex + 1) % course.lessons.length
const nextLessonId = course.lessons[nextIndex].id.toString()
</script>

<template>
  <div class="Lesson page">
    <header>
      <p>
        <router-link :to="'/courses/' + course.id">Back to {{ course.title }}</router-link>
      </p>
      <h1>{{ lesson.title }}</h1>
    </header>
    <div class="Content">
      <vue-vimeo-player :video-id="lesson.vimeoId" :options="{ responsive: true }" />
      <CompleteAndContinueButton
        :courseId="courseId"
        :lessonId="nextLessonId"
      />
    </div>
  </div>
</template>
Reloading page on param change
One of the quirks of Vue Router is that changing route params does not reload the page component. This means the complete and continue button will change the route but the data on the page will stay the same.
In this case, we'd prefer to reload the page component. We can do this by adding a key attribute to the router view and passing to it the full route path. This means it will treat each combination of route params as separate pages.
<template>
  <div class="App">
    <main>
      <router-view :key="$route.fullPath"></router-view>
    </main>
  </div>
</template>
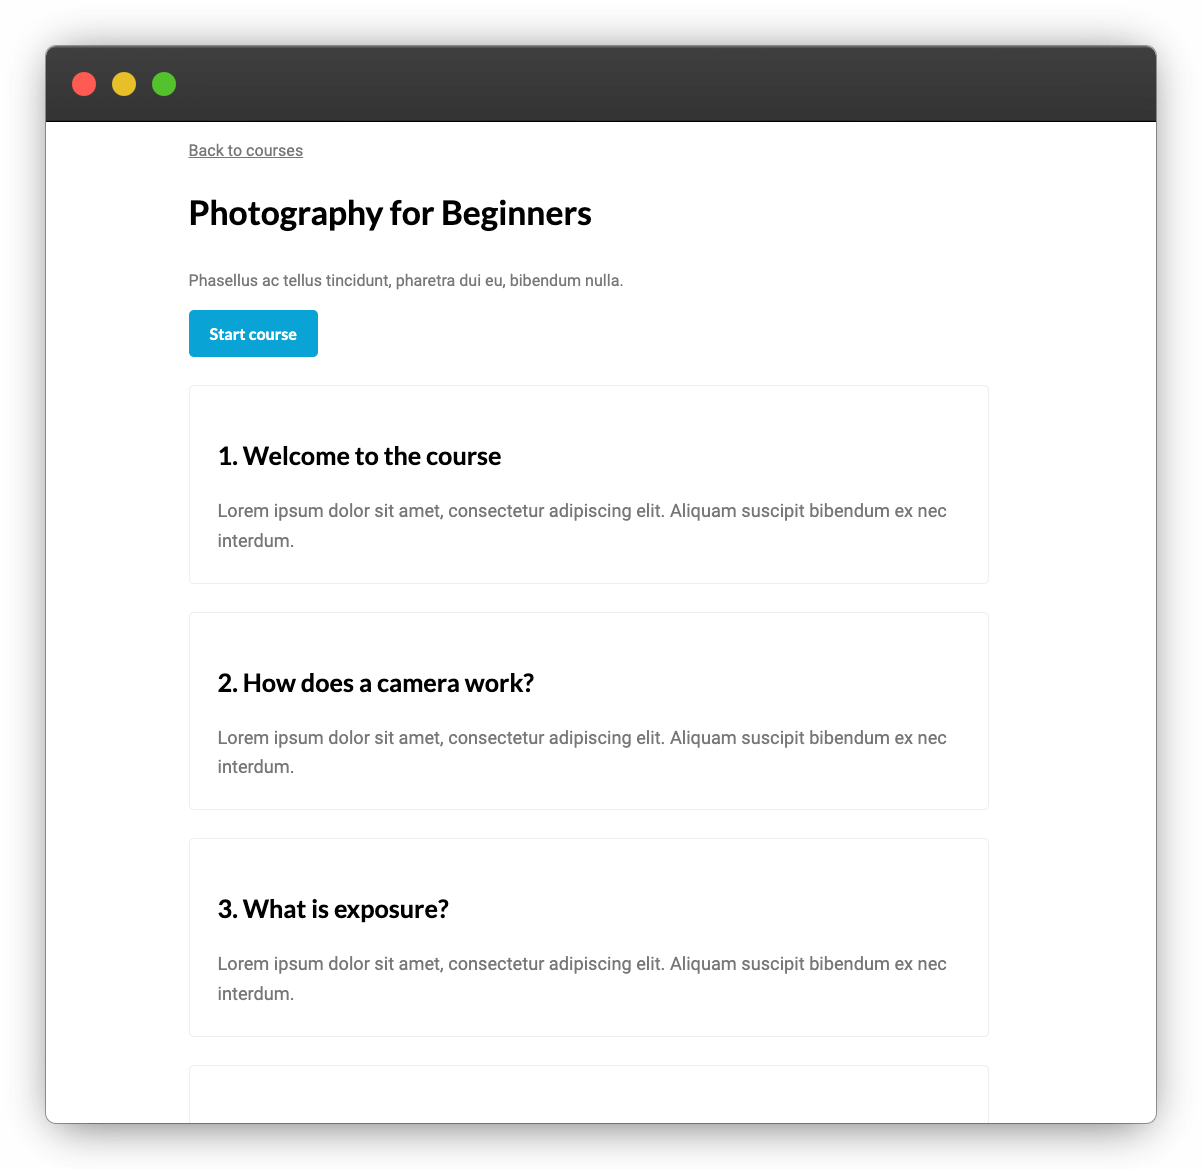
With that done, here’s what our lesson page will look like. The video is, of course, playable, and the student can navigate to the next lesson once they’ve finished watching.
Add student enrollments
Right now, our app has the basic functionality of a course: a student can select a course, select a lesson, and watch the video.
There are other important aspects of online courses that we have not included, though.
Firstly, personalization. Students want to be able to track the lessons they’ve already completed in case they don't finish the course in one go.
Secondly, we may want to protect our content so only paying students can see it. That way we can monetize our course.
Both these features require an auth system allowing students to enroll so we know which courses they’ve purchased and which lessons they’ve completed.
CourseKit
Creating a course backend is an arduous task. An alternative is to use CourseKit, a headless API for online courses which we could easily plug into the app we’ve created.
CourseKit is designed to provide exactly the features we’re missing in our app: student management and role-based access to content.
Adding CourseKit to our project
To add CourseKit to this project we'd create an account and transfer our course data there. We’d then use the CourseKit JavaScript client to call the data through the API.
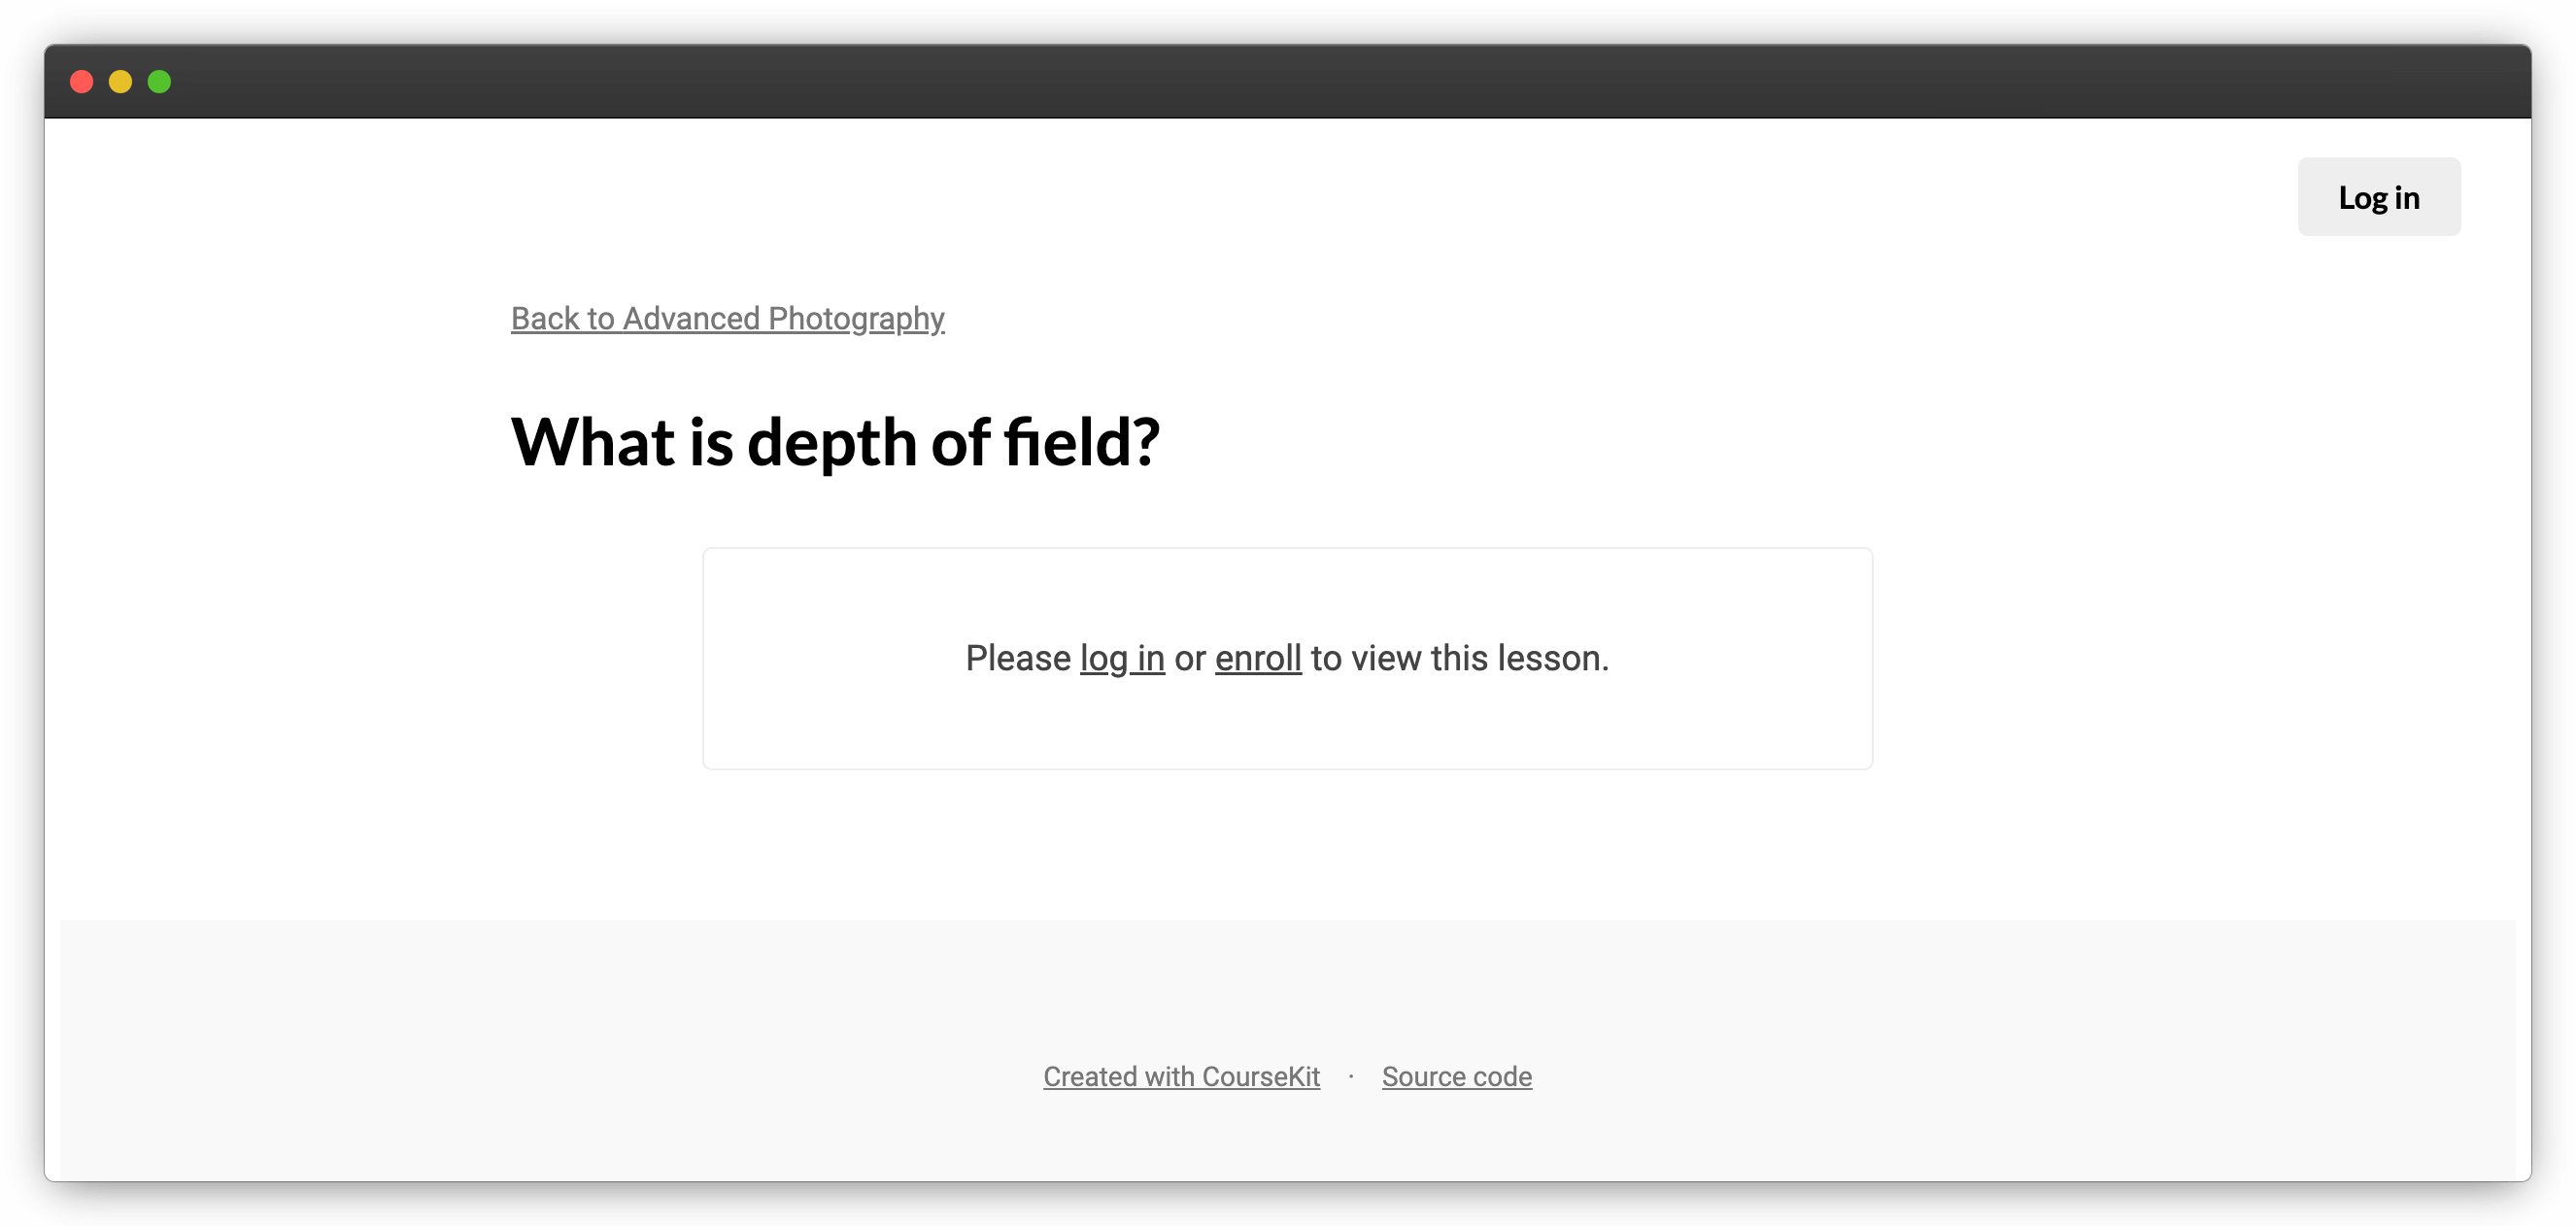
Here’s what the lesson page would look like if we added CourseKit. Note how the content is hidden until the user authenticates.
Here’s the full demo of this site with CourseKit integrated.
Try CourseKit
CourseKit is currently in public beta, meaning it is launched and it works, but some features (e.g. analytics) are still in progress.
If you’d like to try it out, create a free account here: